
Card base = 5.5 x 4.25, Pink layer = 5.25 x 4, Blue layer = 5 x 3.75, Image layer = 3.25 x 2 1/8

Image is colored with Copic Ciao Markers in the following colors: R27, R29, B21, B24, C7 and out lined with C1. I also used a stardust pen to highlight the wind swirls and snowflakes.
The snowflakes are punched with a Martha Stewart craft punch and then spritzed with the Smooch Vanilla Shimmer to give it a bit of a snowy sparkly look. A light blue rhinestone was added to the center of each.
The blue panel was embossed using the new holiday line from Provo Craft that I purchased off of HSN. It came in a package of 6 and included two 5 x 7 folders. Doesn't it go perfect with this stamp?
Here's an up close look!
 The MSC latice border punch was used on the bottom of the blue panel - I think this has to be my favorite border punch!
Thanks for stopping by and have a great week!

Supplies:
Stamp - The Angel Company: winter flurries
Red cardstock - PTI
Blue cardstock - American Crafts
Martha Stewart punches - Lattice and snowflake
Smooch Vanilla Shimmer Spray
Copic Ciao Markers
Stardust gel pen
Light Blue rhinestones from Kaisercraft
 The tree branch is stamped in Palette Jardin Moss and embossed with clear powder. The ornaments and the sentiment are stamped in versamark and then embossed with gold powder. The base of the card is white and covered with Reece paper from TAC, I also added a strip of the striped paper to the right side. Continuing with the gold theme I added a bunch of self adhesive gold dots to it. The trick is to get them on straight!!! So, what do you think?


 I used the new embossing folder from Provo craft called Holly - it's a 5 x 7 folder too! Papertrey ink pure poppy card stock is used as the base and then I pulled a strip of green out of my scraps folder to do the band. This folder is awesome and has a lot of possibilities!
 I decided NOT to use any Holiday stamps on this sketch (getting a littel burned out on them) and went with a generic use stamp.

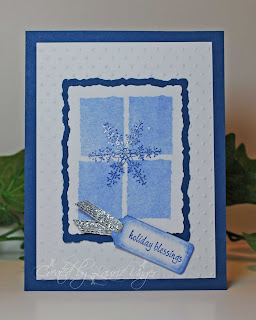 Blue cardstock was used as the base of this card, with a white panel that was embossed using the swiss dot cuttlebug embossing folder. I used my deckled nestabilities to cut out the main panel and a layer of blue. The tag is also cut out using my nesties.
 I used a stardust gel pen to outline the snowflake to give it some glitter and bling. The silver ribbon on the tag goes really well with this and adds a bit more bling! I did sponge around the tag with the same ink, as well.
 I used a dark blue cardstock base and a white layer that is stamped directly on and that's it, no additional layers. I reversed masked a labels 4 from my nesties collection and sponged on some Memento ink in summer sky. The sentiment is from the Simple Joys set and stamped in black. Again, Ornamental Snowflakes were used to stamp images on either side of the sentiment and highlighted with the stardust pen. I decided to use the Bind It All corner rounder on the corners of the white layer. Overall, this one is clean, simple and fast!
 The same coloring method was used on this card. The green designer paper is from Paper Pizazzz and the burgandy polka dots is from Victorine Originals, which can be downloaded. The button is from Oriental Trading Company, which is tied on with some scrappers floss. The sentiment is from The Angel Company.


 Continuing with the Palette Starry night ink on white cardstock, I stamped the Christmas and the word collage side by side. I punched out a darker piece of blue cardstock with the lattice punch from Marth Stewart Crafts and then tied a white satin ribbon over it. All blue cardstock is from American Craft. This card is a quick one that can be mass produced pretty easily.
 I stamped the Christmas and the script images in Starry Night Palette ink. Then sponged some faded jeans distress ink around the outside. The snowflakes on the left side are punched out (Martha Stewart) and glitter in dark blue, light blue and white was added. The designer paper in the back is a long ago retired Stampin Up (I think)! I also added a bit of sponging around the outside of it to give it some added definition. Pretty quick card that has lots of bling to it!
 It took me longer to figure out what to do with the corner pieces than it did to color the image! LOL! Stamp is from Great Impressions and colored with Copic markers - many of them! I added a bit of yellow glow to the outside of the lamp and blended it in with the colorless blender. Not sure if you can really see it in this picture, but in real life it looks pretty cool! I added some sparkles with a stardust pen on the snow throughout the image.
 How about a real quick one - not so many layers and easy to do with punches or Nestabilities?
 Here you go! These precious owls are from The Angel Company called Be Square.
  The designer paper is from my 2008 Christmas stash and I have no idea who makes it. It's embossed with snowflakes througout and all I have left is bits and pieces.