Monday, April 30, 2007
Mini Scrapbook using a children's bookboard
I found this at Michael's for $1, and thought it would make a great base for a mini scrapbook.
I covered it with paper out of DCWV travel papers (8x8) and used my glue stick and my brayer and went to work. I used card stock for pages 1 & 2 and now wished that I had used regular plain paper. Card stock was just too thick for this, especially at the seams. I ended up covering them with ribbon, because I didn't like how it turned out.
I found these new journal stamps by Autumn Leaves that I used in a couple of places throughout the book.
Other stamps used:
TAC - Fern
Victorine Originals - birch tree scene
Copper Leaf Creations - grumpy fisherman
Darcie's - Fish and fishing pole
CTMH - follow your dreams saying
Other supplies:
Travel quotes by DCWV
Cuttlebug alphabet (Olivia) for titles and small tree's
Chipboard file tags (covered with paper from K&Company)
Wednesday, April 25, 2007
Opening the door to abundance
This chipboard piece has been sitting on my desk now for over two weeks, waiting for me to dream up some inspiration for it. You see, it's was a blank chipboard tag and frame that were together, but meant to be separated and used individually. Well, to me together looked better, almost like a Victorian doorway. So, out came the TAC paper, the hip hardware and abundance is stamp sets. I covered the chipboard with paper from Rustic Chic and distressed the edges with Stazon black ink. I then stamped out the hinge from hip hardware onto chipboard and cut them out. I attached them onto the door using black brads. I added a third brad for the door knob, which is very loose, so that you can actually grab it to open. I then stamped the inside saying in cranberry ink from Colorbox and adhered the white CS to the back of the door. I then added the rest of the card stock to finish up the card.
I've been tagged
Angie has tagged me on her blog, so now I get to tell everyone 7 things about myself and tag 7 people. Which I wont, because it looks like everyone has already been tagged. LOL.
1. I was married in the same church as my Mom & Dad and my Grandparents. I actually share my wedding anniversary date with my Grandparents.
2. I played clarinet in Junior and Senior High School. I was even in marching band.
3. I was one of my high school's yearbook photographers.
4. I love to travel, especially in the Caribbean. (I'm looking for Captain Jack Sparrow!)
5. I had a tattoo before they were popular.
6. I love to fish, but don't eat them. yuk!
7. Summer's are reserved for traveling around in the RV on my weekends off.
Let's see....who to tag.
Jennifer Liebelt
Jen Carter (jen's ink spot - link to the right)
MissLyssa at Bendabout bits blogspot
I think the tag is about done now... But we might of missed some great blogs out there. IF you know someone who hasn't been tagged but needs to be, leave me a comment. It's always nice to know that there are people out there who view your creations and care enough to let you know with a tag or a comment!
Saturday, April 21, 2007
File folder tag book
Start with a file folder to create your very own tag book!
With the file folder folded, cut a 3"x7" piece from the folder, including the fold along the bottom edge. With the piece still folded, trim 2 1/4" off the top edge of the front half. Glue a 3"x5" piece of patterned paper over the front half, wrapping it around the fold to cover the bottom of the back half. Use a bone folder to create another crease along the bottom edge, 1/4" forward from the file folder's original fold.
Cover the back half paper of your choice, overlapping the top edge of the diamonds paper. Cut a piece of 3/8"-wide strip of paper and glue it overlapping the seam between the two other papers. Crease the back half 2 1/4" from the top edge, folding it forward to create a flap. Ink all the edges.
Cut the flaps off 5 envelope tags. Stack the envelopes one on top of the other. Glue the envelopes together by running glue stick vertically down the center of the front and back of each envelope. (Tip: Do not cover the front and back of the envelopes with glue! The completed book will not open. Use only a vertical line of glue stick to ensure the book will open.) Apply glue to the top and bottom envelopes and secure the layered envelopes in the folded book.
Add your choice of closure to the flap of the book.
Make your tags for the inside....Stamp, scrap and embellish...have fun and make it your own.
This is from "Hot off the Press" weekly webisodes. Instructions have been modified.
All paper and stamps by The Angel Company.
Wednesday, April 18, 2007
Tri-fold cards
Here are my two attempts at making these awesome little cards. What fun it is to use up some great patterned paper for the corners on these! Stamps used: The Angel Company flourishes, leaves from Pretty Posies, flower from Paisley Rockz and Wonderful Day. The blue and purple flower is from Autumn leaves by Rhonna Farrer, called solid almond petals. My only regret is not using cream card stock on the inside of Burgundy one.
Click the link for the instructions on how to make these darling tri-fold cards:
Tri-Fold Cards
Sunday, April 15, 2007
Altered journal
I bought this hardbound journal at Michael's. Look for them in the dollar bin! ASB was having a weekend challenge to alter something. Well, this is my finished project! It didn't come out too bad for a first try at altering something. I'm not sure if I like the burgandy raffia on the tag, and I'm so-so with the ivory strips of ribbon on the left edge. I adhered the paper with a glue stick and uesed my brayer to even it out. The paper is from K&Company and the sentiment is from TAC, live inspired.
Wednesday, April 11, 2007
Coaster Chipboard Book
I just completed my first chipboard coaster book. This was really fun to put together and of course it stars my four legged child. Here's a tip to getting the paper on your coasters to stay down and look good: use a glue stick and your brayer! Cut your paper a little bit bigger than your coaster, adhere the glue from the stick to the coaster, put your paper down and then use your brayer to flatten everything out. Use your scissors or craft knife to trim off the excess paper, and your done! Another thing to do to make things interesting is mix up the coaster sizes and shapes. Add some ribbon and in the end, whatever you do, have fun! Patterned paper is by The Angel Company.
Thursday, April 5, 2007
Finished!
Ok, here's the final results of the stamping room remodel. Wall paint is cottonwood by Ralph Lauren. All cabinets and counter tops are from Lowes (in stock). It's going to take me some time to get used to all the counter space I now have to work with. I'm also going to have to learn to put things away when I'm done with it...LOL ! But, oh...the drawers and cupboards are soooo worth the hassle of doing-it-yourself!
Serene Butterfly
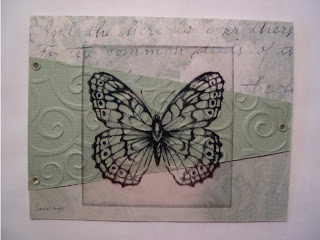
I did this card for the sketch challenge #118 on SCS. For the triangle, I used DCWV light green cardstock and ran it thru my cuttlebug swirls embossing folder. The background paper is from daisyD's Modern Romance Collection. I used the stippled butterfly from Stampin' Up and used stazon on black on a transparency. I inked up around the square to give it a bit of definition. I also added a few eyelets to make things interesting!
Wednesday, April 4, 2007
Subscribe to:
Posts (Atom)